Cutting, Grinding, and Polishing Porcelain Stoneware for Creating Corners
When tiling interiors with porcelain stoneware, ceramic tiles, or faience, one may encounter the need to form a corner from the tile itself. If the design includes decorative elements like trim pieces, moldings, or profiles, it's possible to simply butt the tiles together and then cover the corner with those elements.
However, nowadays more and more people prefer to create clean, seamless corners using the tile itself. In addition, tiles are increasingly used to make various elements where decorative trims simply can't be applied:
-
Bathroom shelves
-
Shower trays
-
Countertops and tables
-
Cooktops
-
Washbasins
-
Windowsills
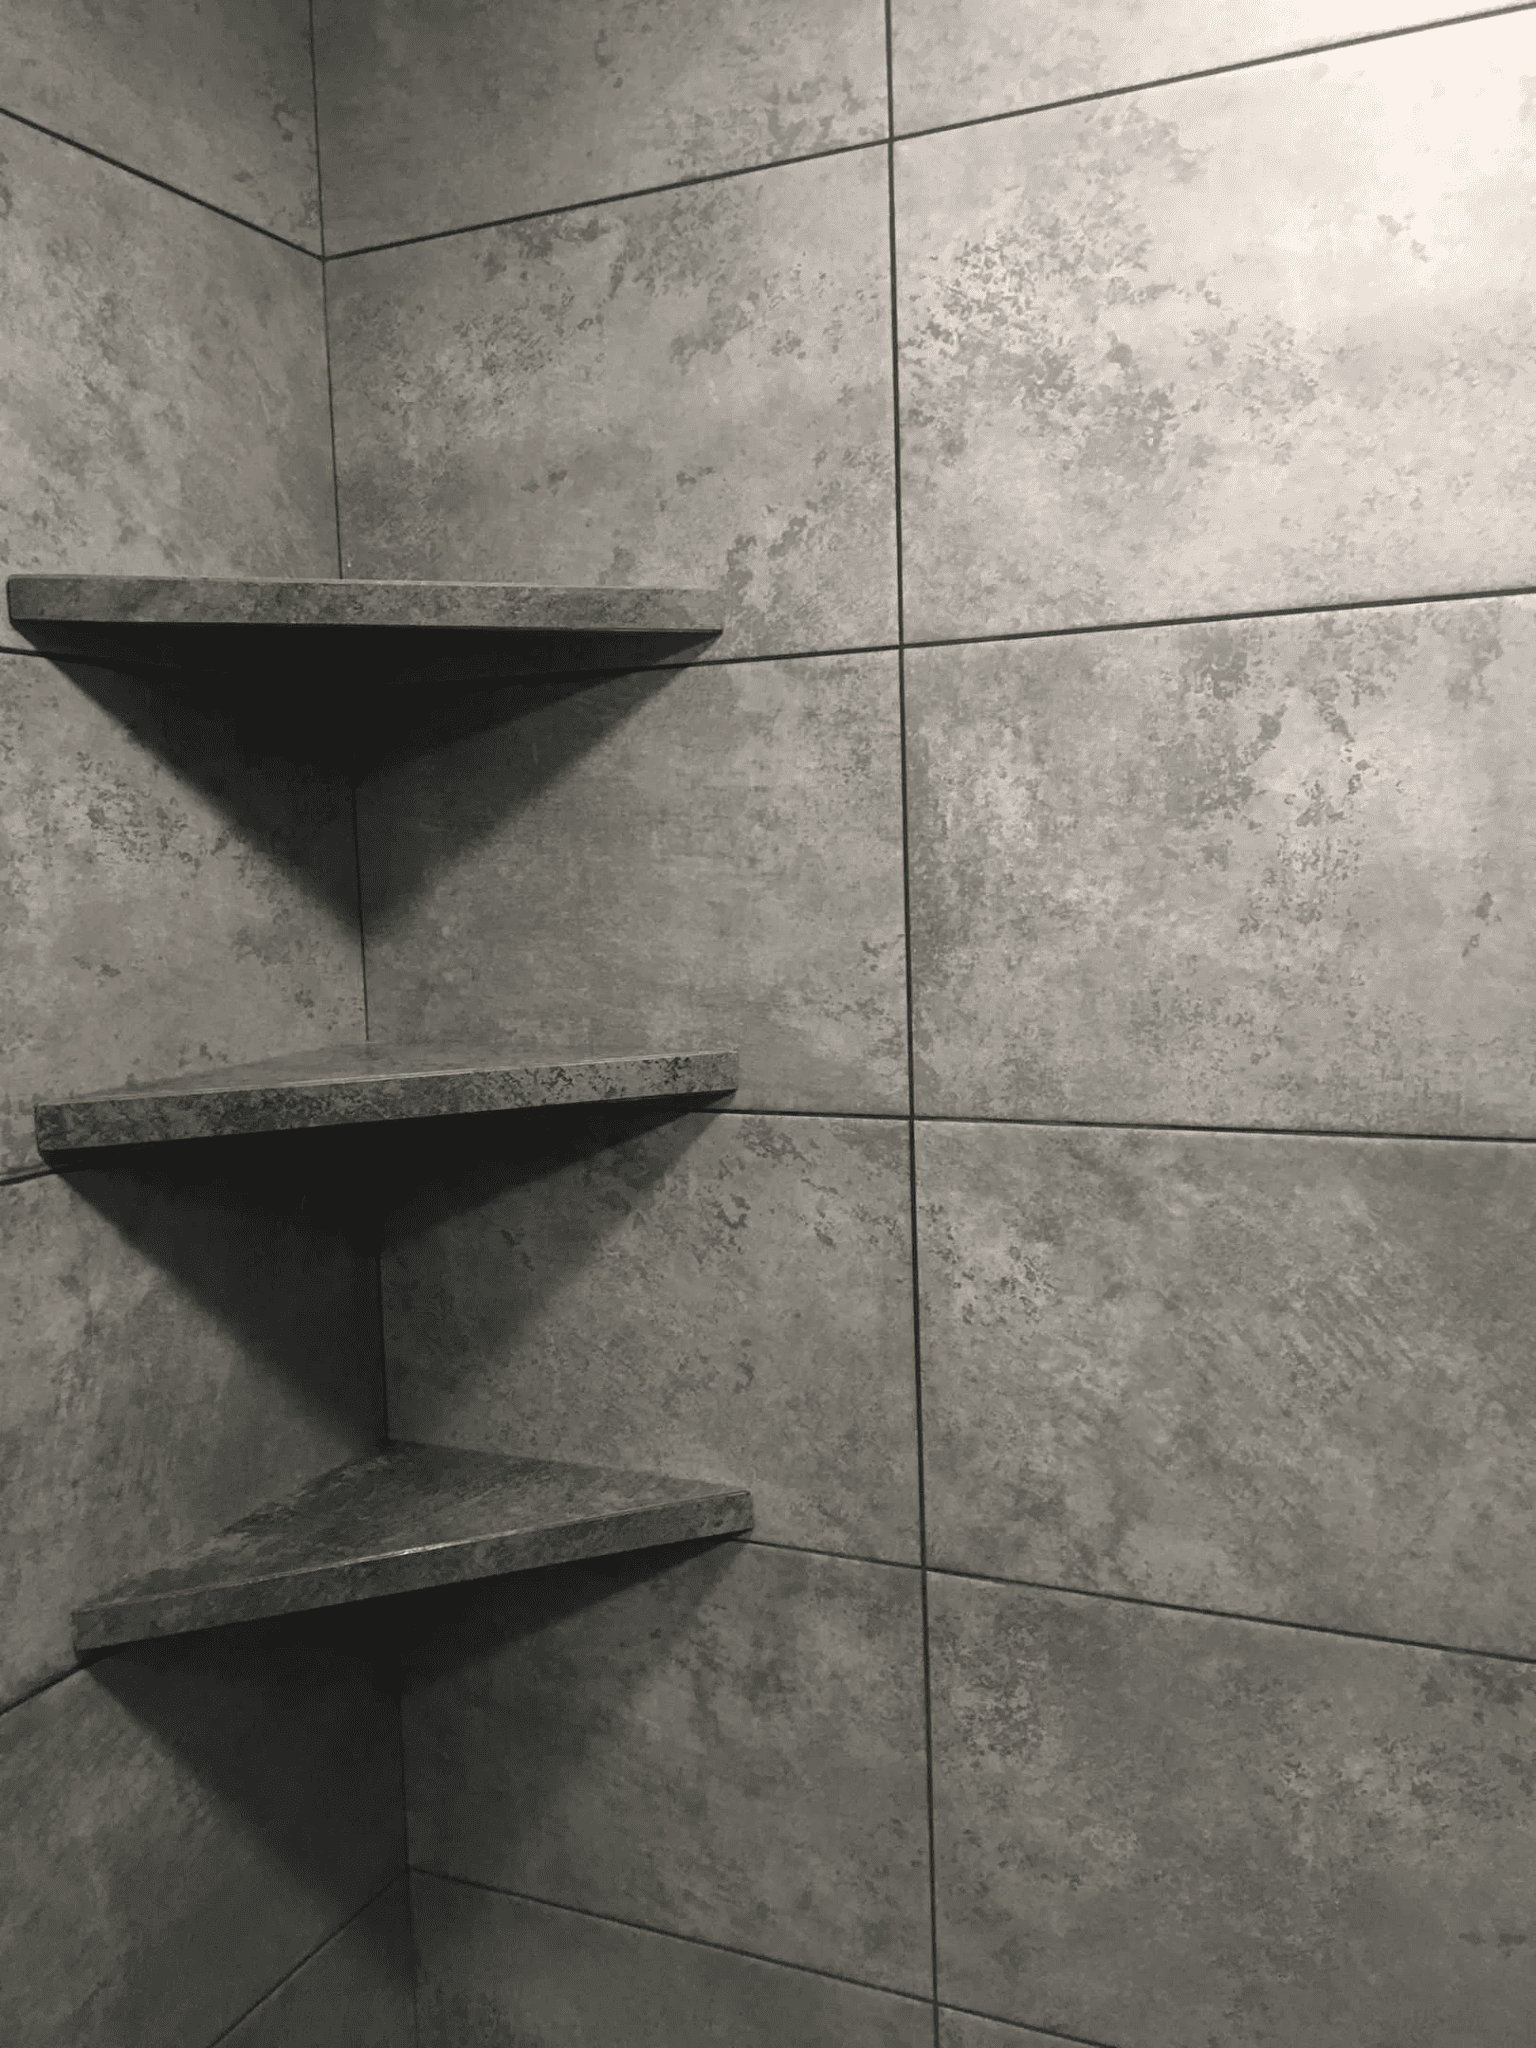
And this is far from the full list of decorative elements that professionals have learned to create from porcelain stoneware. Crafting such elements is a delicate process that requires precise cutting or grinding and further processing of the tile at a 45-degree angle. In this article, we will reveal the secrets to properly forming such corners, including the methods and tools needed to achieve professional results.
Tile Corner Grinding
Corner grinding involves beveling the tile edge using special diamond grinding wheels designed specifically for tile work. The most popular models for this type of processing are the Soft Edge and Hard Ceramics grinding wheels. These tools offer effective material removal and allow you to work as close as 1 mm to the tile edge.
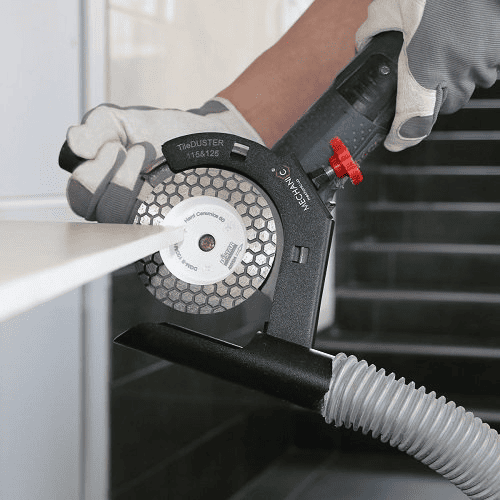
Grinding tiles with diamond tools generates a large amount of dust, so it is recommended to use special dust extraction attachments, such as the TileDuster by Mechanic.
Grinding allows you to shape a 45-degree edge for subsequent polishing. Polishing is the final operation that enables getting as close as possible to the tile edge and forming a clean, aesthetically pleasing 45-degree angle. We’ll go into more detail about polishing at the end of this article.
Grinding the edge at a 45-degree angle is not the most popular method for corner formation, as it takes significantly more time than cutting and requires extra effort from the installer. This method is usually used for small volumes of work.
45-Degree Cutting on a Tile Cutter
An electric tile cutter is a very popular tool for 45-degree cuts, especially when dealing with large volumes. For mitre cutting, bridge-type tile cutters are recommended in combination with special diamond blades of 200–250 mm in diameter.
One of the most popular blades for such operations is the Edge blade. It features a high diamond-bearing layer that not only cuts but also grinds the tile during the cutting process.
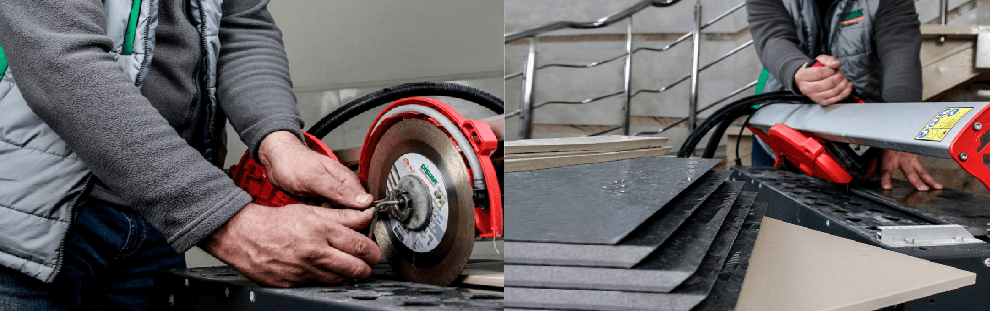
This blade allows you to get even closer than 1 mm to the tile edge, making the final stage—edge polishing—easier for the installer.
One of the drawbacks of tile cutters is that they cannot handle tiles larger than 1200 mm, so forming corners on larger tiles is only possible using an angle grinder or diamond grinding wheels.
45-Degree Cutting with an Angle Grinder
The process of cutting a tile at a 45-degree angle is also referred to as mitre cutting. The angle grinder is the most common tool for performing this task. This is due to the fact that it can handle the job quickly and is capable of processing tiles of any size.
The most popular blade for mitre cuts with an angle grinder 125 mm Edge Dry diamond blade. It features a tall diamond-bearing layer (25 mm), allowing it to get as close as 1.5–1.7 mm to the tile edge.
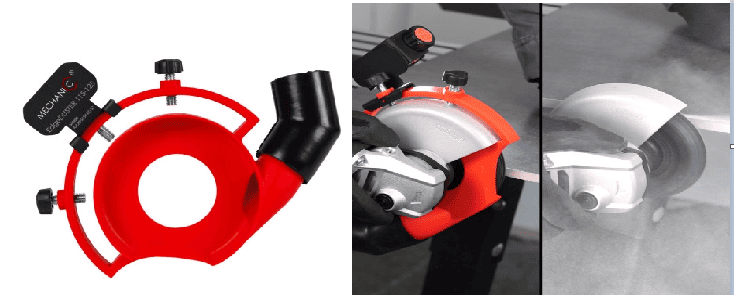
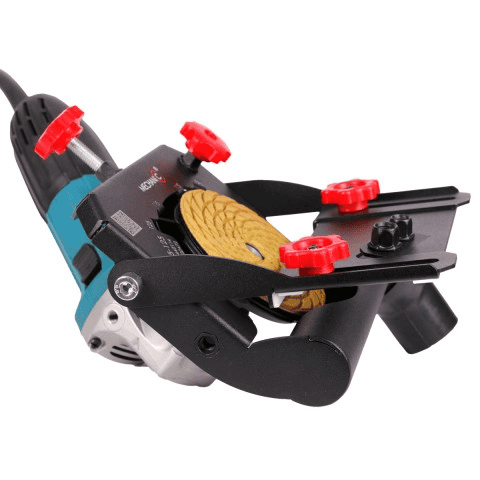
Professionals often use special accessories to speed up the mitre cutting process and control dust—such as the Duster 45 attachment.
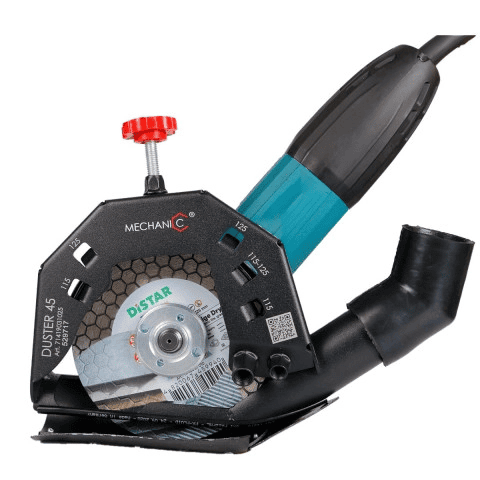
This accessory allows tiles to be mitre cut at any angle. Since professionals often aim to create sharper corners, this tool is in high demand. Another advantage is full control over the cutting process—the tile installer can adjust not only the cutting angle but also the position of the blade relative to the tile.
Mitre cutting with the Duster 45 is considered a manual process, but there are more advanced, professional-grade mitre tools that make the process more automated.
Slider 45
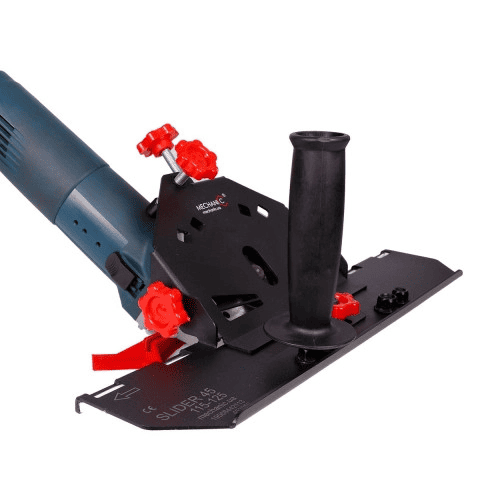
This device can be classified as semi-automatic, as it needs to be set up just once for a specific tile and blade—and then you can perform hundreds of cuts with excellent repeatability and high cutting quality. After cutting with the Slider, the bevel is perfectly smooth, comparable to that achieved with an electric tile cutter, and requires minimal finishing.
Slider Pro
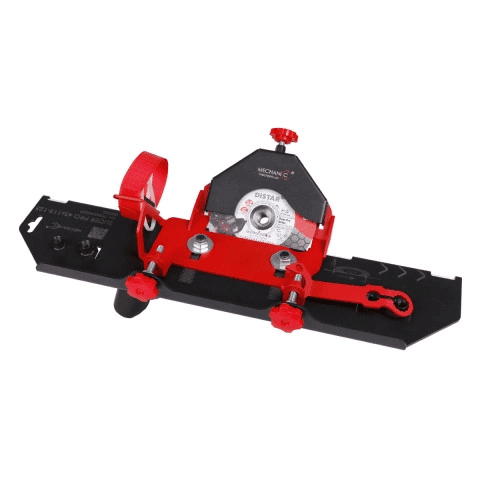
This type of Slider is also designed for semi-automatic mitre cutting but offers several advantages over the standard model:
-
Extended sliding length
-
Added fine-tuning screws
-
Equipped with a bearing assembly to minimize runout on the grinder shaft
-
Option to mount the device to a table for working with small pieces
-
Adjustable dust extraction height to match different tile thicknesses
45-Degree Edge Polishing
After cutting or grinding a tile at a 45-degree angle, a small unwanted “lip” often remains—typically 0.8 to 2 mm thick, depending on the tool used. This lip is removed using special polishing pads.
Polishing pads are mounted onto a special backing pad using Velcro, which is located on the back side of the pad. This backing pad is installed on an angle grinder, and the polishing process is carried out at low speeds (2500–4000 RPM). Therefore, a grinder with adjustable speed is required for this task.
As with 45-degree cutting, polishing can be performed manually or in a semi-automatic mode using a special accessory.
Manual Polishing
Edge polishing is not a quick process, so most professionals prefer to use lightweight and ergonomic grinders for this task. The amount of dust generated during polishing is relatively small (around 10 grams per minute), but it’s still recommended to use a dust-extraction accessory like EdgeDUSTER, which can collect over 95% of the dust.
Semi-Automatic Polishing
This type of final edge finishing is possible with the help of a unique accessory called the Liner.
The device allows you to adjust both the angle and the grinding depth, while the built-in dust extraction system enables completely dust-free operation. This tool makes the final polishing process fast, comfortable, and ensures perfect consistency from tile to tile. Thanks to these unique features, it becomes an indispensable assistant when handling large volumes of mitre cuts.
Helpful Tips
Thanks to various accessories and diamond tools, forming corners from tiles has become a routine task for professional tilers. However, if you are not very experienced in this area, be sure to follow these simple tips to achieve the best results:
-
For 45-degree cutting or grinding, use equipment with sufficient power (for angle grinders, at least 1.2 kW).
-
For final polishing, use a lightweight, low-power grinder that fits comfortably in your hand.
-
To determine how close you can get to the surface with a blade or bit, perform a test cut on a scrap piece of tile.
-
Cutting at 45 degrees does not require excessive pressure.
-
Factory tile edges (also known as rectified edges) should be squared off before performing a mitre cut.
-
During cutting, grinding, or polishing, always firmly secure the tile to the table.
-
Avoid making corners too sharp—leave 0.1–0.2 mm of material at the edge.
-
For the best finish, use multiple polishing pads with different grit levels.
-
Always work with special accessories. They’ll make your work faster, more precise, more comfortable, and will significantly reduce dust.


